If you are reading “How to start a WordPress Blog” it means you want to step into the blogging world.
That’s a terrific idea, these days it’s quite simple to get a site and start operating within just a few time. If you are really serious about blogging and want to be known as a pro blogger, then you need to be sure that you are on the right track. A right track will lead you to the fruitful results while a wrong track will waste all of your struggles.
How to start a WordPress Blog – Easy and instantly
So let’s start step by step.
1. How to choose the Topic for Blog?
It is the most crucial decision which you are going to take at the time when you made your mind to setup a blog. Because merely writing and writing doesn’t guarantee your success. Yes, writing also matters, but there are some other things. You don’t need to be worried we will discuss all the important elements in our article. Just stay with us
So the question is Which topic you should choose for your blog? The answer is very simple; you should choose a subject about which you are enthusiastic and much knowledgeable. If you aren’t enthusiastic about the topic, then writing will become a dry and boring for you. Additionally, you need to do more research to grip over the new topic.
2. Domain Name
The domain name is incredibly essential because it is the first thing that the visitors are going to view. Most significantly, try to purchase a domain name by including one of your keyword (main topic). For example, a blog on cooking may include “Chef” in its domain name. So, it should give the people an idea of what your web page contains. Furthermore, Your domain name needs to be easily understandable and memorable.
There are many domain registrars, but I would recommend you to purchase a domain from the well-reputed domain registrar. For this, my suggestion is the NameCheap. They offer domain at reasonable rates with very low renewal rates including one year free Whois Guard subscription.
After buying a domain name, the next step is to buy a hosting.
3. Hosting:
Hosting enables you to go online. Hosting is a service where you can store your site contents like articles & pictures and the installation of content management system like WordPress. Choosing the best WordPress hosting little bit complicated nowadays due to the variety of companies available. If you are a newbie and don’t have the enough knowledge about hosting, don’t worry I explain it in an easy manner.
If you are Sluggish or don’t have the time, we also help you to select the best hosting.
Because at the start, your blog has low traffic so a cheap hosting is good. But cheap WordPress hosting services are less consistent in performance. I would recommend you to host a blog using BlueHost hosting services, which is really budget friendly and consistent with performance.
After completing the purchasing procedure, they will provide a control panel. Most of the companies using industry prevailing cPanel while some companies develop its customized panel. cPanel allows you to manage the databases, emails, backups, and domains etc. Through cPanel, you can install the CMS’s and keep an eye on the different statistics.
4. WordPress & its Installation:
What is WordPress?
WordPress is content management system which helps in the creation of websites. It helps you to share your thoughts with the online world. Nowadays it is very common and easy to setup a blog just because of WordPress.
Once you have made your mind about the hosting, then your next step is to set up the WordPress. A short time ago, setting up websites was a problem because you need special skills that how to install and operate it. You had to set up much of the setting manually, and nothing is automatically. It took pretty much time.
But nowadays, setting up a WordPress is a very easy and doesn’t require any special skills. With the help of automatic installers you just need to hit a click and there you go, it’s done.
Here is the snapshot of BlueHost cPanel, where you can clearly see the “Install WordPress” feature to install the WordPress by a few clicks.
5. Introduction to WordPress:
Once you’ve set up WordPress, now you can log in to the WordPress panel. The control panel looks like this
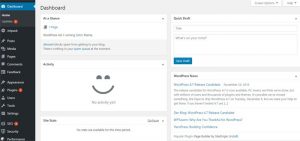
You’ve set up WordPress, and you are gazing at its backend. The panel is the main center of your WordPress blog where you will be able to manage each and everything like post and plugins.
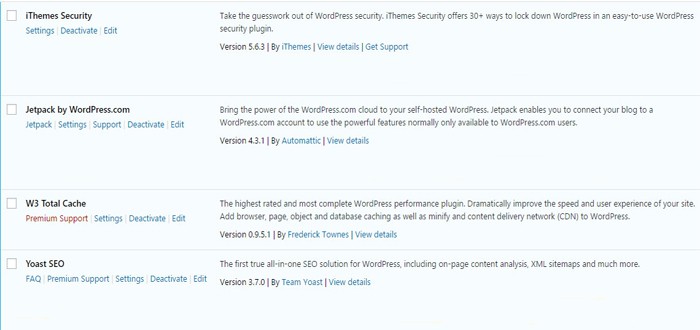
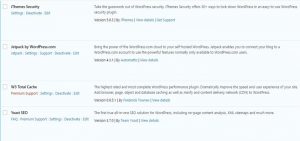
Now first of all install some of the basic plugins. These plugins help to improve security, speed and SEO of your blog.
Here are some of the all-time best plugins
Yoast: A plugin best for SEO
iThemes Security: This will help to secure your site
W3 Total Cache: Improve the speed of your site
6. Themes Installing
After installing these plugin, the next step is to improve the appearance of your website. It all depends on you whether to apply a free theme or a premium. Free themes have some restriction, and you don’t have the full control over its features.
The theme of your blog is the most significant aspect while setting up a blog because a blog or a site which is less friendly to desktops and mobile can cause the low ranking in search engines. And ultimately can cause the failure of your valuable idea.
Free Themes
Many people when they are just at begging they decide to use a no cost template instead of a quality template, which have the limitation as we described before. WordPress also offer tons of free themes. Just navigate to the “appearance” at the side bar. Now click on the “Themes” and apply it which you want to.
For Premium themes.
If you want the Premium themes, then I would recommend you to purchase it from the Thrives themes. Because thrive themes are highly customizable. You can easily change the things which you want to without getting any special knowledge.
7. Write Down your First Post:
Now it’s the time to do some work for which you are setting up a blog. Just log into the WordPress dashboard where you can see the “Posts” at the sidebar, Click on it.
Now Click on the “Add New”
Now start writing your post, but there are some things you need to be careful.
Here start writing your post and save it as a draft if you haven’t completed it. Make sure your main keyword is shown in the body of article After writing the article scroll down till you see the “Yoast SEO” box. In this portion click on the “Edit Snippet”. Now fill these crucial fields
1. SEO Title: This is a title which shown in search results.
2. Meta Description: It is the description of your article shown in the search engine results.
3. Focus keyword: Write down the main keyword of your topic. e.g the keyword of “top 10 best cheap spy drones” might be the “cheap spy drones”
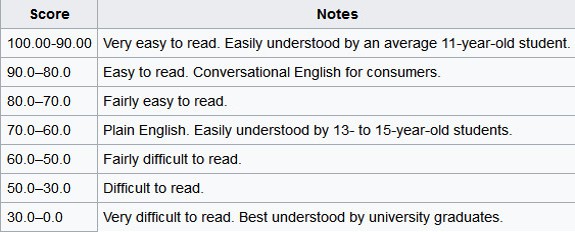
Now click on the “Readability” tab, which given in the “Yoast SEO” portion.
Here try to turn these requirements into Green until the overall readability rating turns to green. The overall rating can bee seen on the “Readability” tab.

After writing the complete article publish it and let the people know about your experience or thoughts. Setting up a blog is very easy and quick process. When you select the topic, it will take about nearly 30 minutes for purchasing a domain, hosting and it complete setting till the step number 6. After that its all up to you as fast you can write as quick you can post it.
Best of Luck for you in the journey of Blogging.